Bulk import is the fastest and most reliable method to create your employee database in Zest or to keep it up to date over time.
Before getting started, it is essential to understand how Zest structures your organization and which data must be included in your import file.
This guide walks you through the process step by step, in a simple and clear way ✨
🧱 1. Three essential concepts before importing users
Zest is built on a data model called SmartOrg — a core foundation for all use cases (surveys, analytics, permissions, performance reviews, etc.).
Concept 1: SmartOrg (your organizational structure)
SmartOrg models your organization using three distinct organizational trees:
- Teams → hierarchical relationships (manager → employee)
- Departments → organizational structure
- Locations → geographical structure
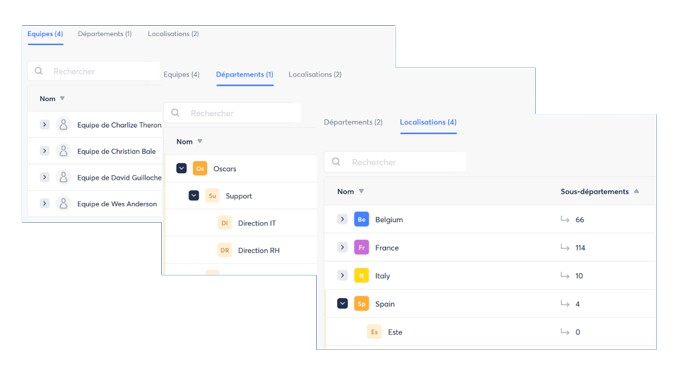
These dimensions are independent from each other and can be used separately or combined.
They allow you to:
- target specific populations,
- analyze results,
- define user permission scopes
Concept 2: Roles in Zest
Zest provides 6 roles, which define each user’s permissions:
- Super Admin — full configuration + global view
- Global Viewer — global data access
- Department Admin — delegated view and configuration
- Location Admin — delegated view and configuration
- Manager — permissions derived from the Teams tree
- User
These roles structure visibility, actions, and analytical capabilities.
Concept 3: Attributes & SmartGroups
Attributes
You can enrich your import file by adding optional columns.
Common examples: Gender, tenure, date of birth, status, contract type, etc.
An attribute must follow one of the 4 formats:
- number
- text
- boolean (Y/N or true/false)
- date (YYYY-MM-DD)
SmartGroups
A SmartGroup is a dynamic population defined using your attributes and your SmartOrg. It is used to:
- send a survey to a targeted audience,
- launch a review campaign,
- segment analyses.
ℹ️ SmartGroups are automatically updated during your imports.
Only Super Admins can launch targeted campaigns.
🧩 2. Manual Import
Zest provides a standard Excel file containing 3 sheets:
- Users
- Departments
- Locations
📥 a. Where to Get the User Import File
To download your import file, simply follow these steps:
- Go to the top right of your screen in the Back Office.
- Click on Users.
- Select the Import tab.
- Then choose the desired option:
- “Blank import file” → to obtain a fully empty, standardized file, ideal for a first import.
- “Current user database” → to retrieve the most recent version of your database and easily modify it (additions, updates, corrections).
💡 Tip: starting from your current database helps avoid data entry errors (e.g., accents, commas, exact unit names).
b. Complete the Import File:
Column names and sheet names must not be changed under any circumstances.
| Column | Required? | Description / Expected Format | Rules & Best Practices |
|---|---|---|---|
| status | ✔️ | User status: • active: active in Zest • suspended: suspended but visible • removed: deleted and invisible | A user is not deleted if absent from the file. You must specify removed, except in differential imports where absence = automatic deletion. |
| ssoLogin | No | SSO login identifier | Fill in only if SSO is enabled. |
| managerId | No (recommended) | Email or userId of the direct manager | Must already exist or be present in the file. Hierarchical loops are not allowed. |
| department | ✔️ | Assigned department | Must exist in the departments sheet. The name must be exactly identical. No duplicates. |
| location | No | Employee’s geographic location | Must exist in the locations sheet and be written exactly the same. No duplicates. |
| rank | ✔️ | User role: • user • superAdmin • globalViewer | Assign superAdmin and globalViewer roles sparingly, according to your internal rules. |
| lang | ✔️ | Interface language (ISO 2-letter code: fr, en, es…) | Check the list of available languages in the “Zest system.” |
| function | No | Employee’s role/position | Can be used in filters and to enrich profiles. |
| unit / parent (departments & locations sheets) | ✔️ | • unit: list of all existing units • parent: direct parent of each unit | The parent must exist in unit. No duplicates. Two units cannot share the same name. |
| departmentsAdmin | No | Departments administered by the user Format: Dep 1|Dep 2|Dep 3 | Each department must exist in the departments sheet. Follow the exact spelling. |
| locationsAdmin | No | Locations administered by the user Format: Loc 1|Loc 2|Loc 3 | Each location must exist in the locations sheet. Follow the exact spelling. |
| custom attributes | No | Custom attribute columns: • text • integer • boolean (yes/no) • date (DD/MM/YYYY) |
⚠️ Important Reminders
- Management loops are strictly prohibited (A → B → C → A).
- An employee can have only one assignment per hierarchy tree.
- Labels must match exactly, character for character across all sheets.
- There cannot be two identical employee IDs or emails in the email and userid columns.
Manual import allows you to add, update, or clean your employee database in just a few clicks, while respecting each administrator’s permissions and scope.
🔎 c. Two Types of Import: Incremental and Differential
Zest now offers two import modes, tailored to your update needs.
🟩 Incremental Import (most common)
➡️ Adds new users
➡️ Updates information for existing users
➡️ Deletes employees if their status = removed in the file
Ideal for:
- adding an employee,
- updating a role, manager, attribute, or assignment,
- correcting existing data.
🟥 Differential Import (“cleanup” mode)
➡️ Adds new users
➡️ Updates employees present in the file
➡️ Automatically deletes all employees absent from the file
Ideal for:
- fully realigning Zest with your HRIS,
- performing a major annual or semi-annual cleanup,
- ensuring that only people present in your HRIS appear in Zest.
⚠️ Warning: this mode must be used with caution.
An unintended deletion requires manual reactivation (or a new import).
👥 d. Import by Administrators (Delegation Within Their Scope)
It is now possible to delegate imports to other administrators, according to their defined scope within the SmartOrg.
Who Can Import?
- Super Admins → global scope
- Department Admins → only within their department
- Location Admins → only within their location
This feature allows you to:
✔️ give more autonomy to local teams,
✔️ speed up day-to-day updates,
✔️ maintain strict consistency with your organization’s internal permissions.
🎛️ Delegation is enabled in the Back Office settings:
- Back Office → Permissions
- Click on the “General” section
- Enable the option “Can create and modify users within their scope, manually via the back office or by import.”
🔄 3. Automated User Import
Automated import allows you to synchronize your users between your HRIS / internal directory and Zest without any manual action. It is the ideal solution to keep your database continuously up to date, reduce errors, and lower administrative workload.
Zest offers several automation methods: SCIM, SFTP, or native integrations with certain HRIS platforms.
🎯 Objectives of Automated Import
- Keep employee data automatically synchronized
- Reduce errors and accidental deletions
- Align Zest with your HRIS or Active Directory
- Save time on regular updates
- Ensure a SmartOrg structure that is always clean and consistent
⚙️ 1. Automated Import Methods
Zest provides 3 automation modes depending on your internal infrastructure.
1️⃣ SCIM (Microsoft Entra, Okta, etc.)
SCIM (System for Cross-domain Identity Management) enables continuous, automatic updates of users from your directory.
👉 How It Works
- Your system (Microsoft Entra/ADFS, Okta, Google, etc.) automatically pushes:
- user creations,
- updates,
- suspensions.
- Synchronization is one-way: HRIS → Zest.
✔️ Advantages
- Full automation
- Immediate updates
- Secure and standardized
- Ideal for organizations using Active Directory / Okta
📘 Step-by-Step Documentation
2️⃣ SFTP Protocol
The most flexible method: you deposit CSV files on a secure server, and Zest processes them automatically.
👉 How It Works
- A CSV file (users / departments / locations) is deposited automatically on a dedicated SFTP server.
- Zest retrieves this file every night.
- Works in incremental or differential mode, depending on your configuration.
✔️ Advantages
- Ideal if your HRIS has no native connector
- Allows synchronization of the entire SmartOrg structure
- Compatible with scheduled automated exports
📘 Documentation to Follow
3️⃣ Native HRIS Integrations
Some HR platforms already provide a ready-to-use Zest connector.
Examples: Personio, Lucca, Cegedim, Holaspirit, BambooHR, ADP, PayFit, Everwin, PeopleSpheres, etc.
👉 How It Works
- Synchronization is configured directly in Back Office → Integrations
- Data flows automatically into Zest
- Depends on the fields available in the HRIS API
✔️ Advantages
- Quick setup
- Standardized
- Fewer technical configurations required