🧱 1. Three essential concepts before importing your Employees
Zest is based on a model called SmartOrg – a core foundation for all your use cases (surveys, analytics, permissions, Review campaigns, etc.).
Concept 1: SmartOrg (your organizational structure)
SmartOrg models your organization through 3 separate organizational trees:
- Teams → hierarchical links (manager → direct report)
- Departments → organizational assignments
- Locations → geographical assignments
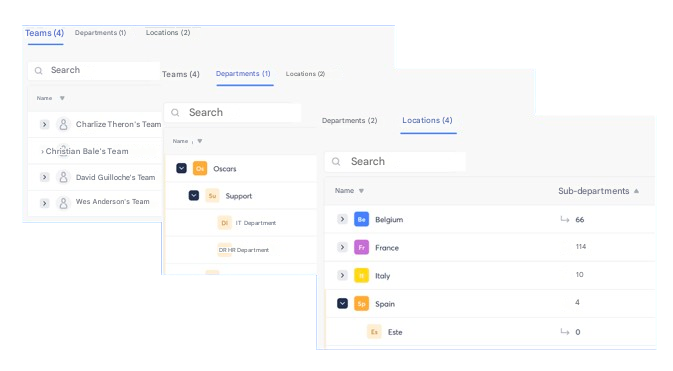
These dimensions are fully separated and can be used independently or together.
These three trees enable:
- population targeting
- results analysis
- defining permission scopes for users
To go further: Introduction to SmartOrg
Concept 2: Roles in Zest
Zest offers 6 roles, which determine each user’s permissions:
- Super Admin — full configuration + global view
- Global View — global access to data
- Department Admin — delegated view + configuration
- Location Admin — delegated view + configuration
- Manager — permissions derived from the Teams tree
- User
These roles structure visibility, action permissions, and analysis capabilities.
Article to consult: Guide to roles and permissions in Zest
Concept 3: Attributes & SmartGroups
Attributes
You can enrich your import file by adding optional columns.
Common examples: Gender, seniority, date of birth, status, contract type…
An attribute must follow one of 4 formats:
- number
- text
- boolean (Y/N or true/false)
- date (YYYY-MM-DD)
SmartGroups
A SmartGroup is a dynamic population defined using your attributes and your SmartOrg. It is used to:
- send a survey to a targeted audience
- launch a Review campaign
- segment analyses
ℹ️ SmartGroups are automatically updated during your imports.
Only Super Admins can launch targeted campaigns.
See the article: Create and Edit a SmartGroup (for Super Admins)
1️⃣ Where to retrieve your import file
To access the import file, follow these steps:
- Go to the top right of your screen in Back Office
- Click Users
- Open the Import tab
- Choose one of the two available files:
- Blank import file → a completely empty template, ideal to start from scratch
- Current user database → your existing pre-filled database, ideal for updates
💡 Tip: starting from your current database avoids 90% of errors (unit names, accents, spaces, etc.)
2️⃣ Before you start: understand the file rules
The file includes several important constraints that ensure a successful import.
Here are the main rules to know.
3️⃣ How to correctly fill in the import file
To help you fill in your file, here is a support video and more details below:
https://www.youtube.com/watch?v=cogcY1AsMIw&list=PLaf6YG3gwN5ZER-nhuwVEvEBUQPZsLfOG&index=6
🔐 Password
- The password must be in text format
- Excel often automatically converts a date (YYYY/MM/DD or DD/MM/YYYY) → which breaks the import.
➡️ Solution: force the column format to “Text” before entering anything.
🟦 Departments
- No department should appear in the locations tab.
- The Departments and Locations trees are independent and separated.
- The departments entered in the users tab must exactly match those in the departments tab.
- You can add new sub-departments, but never remove them in an update.
- Two departments cannot have the same name.
💡 Check the tree in preprod: if a department appears “outside the tree”, it is missing from the tab.
📍Custom attributes
- For age: do not write “28 years old”. Use date of birth instead (age ranges can then be automatically calculated).
- Attribute columns must be named exactly as in Zest.
- Accepted formats:
- Text
- Number
- Boolean (yes/no)
- Date (YYYY/MM/DD)
✉️ Emails
- Super Admin or HR users must have a valid email address.
- No email can appear as a duplicate.
- No apostrophes, spaces, or Excel formulas.
➡️ Use copy-paste values before import.
🆔 UserId / Email / ManagerId
- Each Employee must have either an email or a userId (employee ID).
- Mixed populations (some with email, some with employee IDs) are supported.
- If an Employee does not have an email → a mandatory userId must be provided.
- The managerId must correspond to:
- an email or a userId present in the same database
- no hierarchical loop is allowed
(e.g.: A → B → C → A)
🏷️ Rank / Status / Lang
These three columns are mandatory for all users.
- rank: user / superAdmin / globalViewer
- status:
- active
- suspended (e.g. long-term leave)
- removed (GDPR deletion initialization)
- lang: ISO code (fr, en, es…)
📌 A user absent from the file is not automatically deleted (except in differential import).
🧹 Empty rows & unnecessary columns
- Never leave empty rows, especially in the middle of the file.
- Fields without information should simply remain empty, not “N/A” or “no info”.
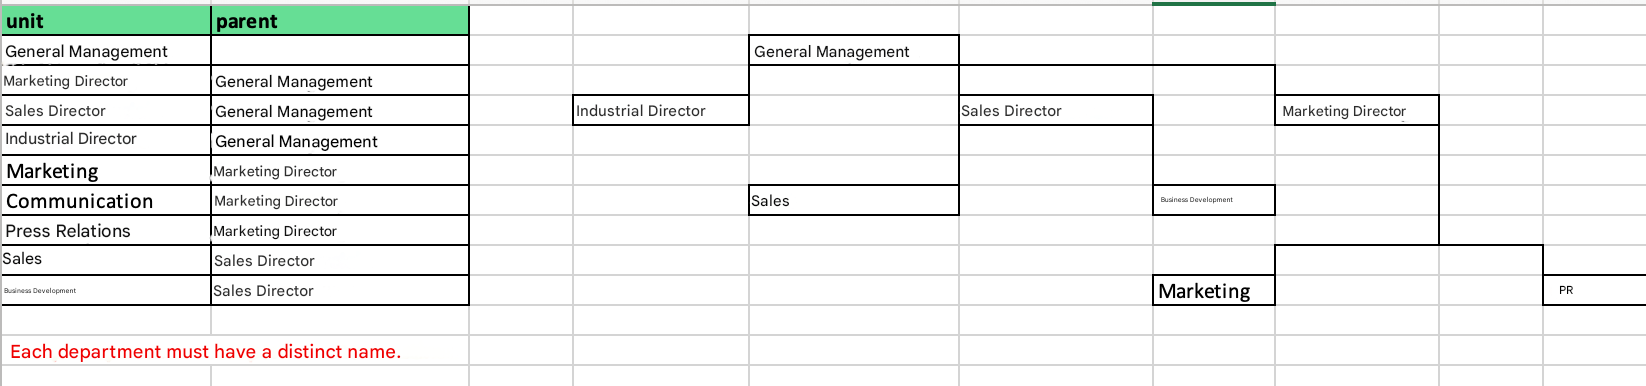
🗂️ Departments & Locations – structure
- Always place the main/parent units row before the children.
- A “parent” must necessarily exist in the unit column.
- A department in unit cannot have the same spelling twice
Here is an example of how to fill it in:
4️⃣ Useful Excel formulas
(to detect errors before import — recommended options)
✔️ Detect a manager/direct report loop
=IFERROR(IF(INDEX(H:H; MATCH(H2; C:C; 0))=C2; "LOOP!"; "OK"); "OK")
📝 Simple explanation:
- Column C = Employee userId / email
- Column H = managerId
This formula checks that a manager does not point to an Employee who points back to them (hierarchical loop prohibited).
“LOOP!” = error to fix
✔️ Check duplicate email addresses
=COUNTIF(C:C;C2)
📝 Simple explanation:
- Column C contains emails or userIds.
- The result indicates how many times the email appears.
→ 1 = OK, ≥2 = duplicate (import impossible).
✔️ Check whether a department or location exists in the master
=IF(COUNTIF(A:A;B2)>0;"ok";"false")
📝 Simple explanation:
Copy-paste before the department or location column in the corresponding tab, to the right of the input. We recommend the same for departmentadmin or locationadmin.
- A = list of units (departments/locations)
- B = department/location used in the users tab
→ ok = the unit exists
→ false = spelling / space / uppercase / missing unit error
✔️ Format a date in international format (YYYY-MM-DD)
Use → Format cells > Date > English (United Kingdom)
✔️ Check that the manager exists in the email or userid column
=IF(COUNTIF(C:C; H2)>0; "present"; "false")
📝 Simple explanation:
- Column C = Employees
- Column H = manager
→ present = OK
→ false = the manager is not in the file → import impossible
5️⃣ Practical tips from the training 🎓
✔️ Status “removed” = the user will no longer have access to Zest and will no longer receive surveys.
The data is retained in compliance with GDPR.
✔️ Status “suspended” = perfect for long absences (sick leave, leave of absence, etc.).
Reactivation in one click via import or the Back Office.
✔️ For a large update (new hires / departures):
→ use the Excel file, faster and cleaner than individual edits.
✔️ If you cannot find a setting in the Back Office:
→ contact Zest Support (chatbot + email), some actions require database intervention.
✔️ Use the Zest Academy to properly understand SmartOrg, permissions, use cases, and structuring best practices.
6️⃣ Summary: the 10 most common mistakes to avoid ❌
- Duplicate email
- Spaces or apostrophes in emails
- Missing or misspelled managers
- Departments not present in the master tab
- Dates in the wrong format
- Columns filled with “N/A”
- Password not formatted as text
- Empty rows in the file
- Missing userId for populations without email
- Rank / Status / Lang not filled in
7️⃣ In summary 🧠
✔️ Retrieve the file from Back Office → Users → Import
✔️ Preferably use the current database
✔️ Respect strict formats (dates, emails, userId)
✔️ Check your SmartOrg and your attributes
✔️ Always test your file on a sample before the final import