What are the technical prerequisites for deploying Zest?
Before deploying Zest to your employees, several technical elements must be validated with your IT, Security, and HR teams.
This step ensures that:
- your employees can access Zest;
- the services required for Zest to operate are not blocked;
- emails sent by Zest are received correctly;
- the employee login method is defined;
- your user database can be created and kept up to date;
- any integrations are anticipated before launch.
We recommend sharing this article with your IT team from the very beginning of your Zest project.
🔐 Prerequisites to validate before launch
Zest can be accessed from the following URLs:
- Production: https://zestmeup.com/app/
- Pre-production: https://preprod.zestmeup.com/app
| Priority | Item to validate | Team concerned | Mandatory? |
|---|---|---|---|
| 1 | Access to Zest and authorization of required services | IT / Security | Yes |
| 2 | Browser compatibility | IT | Yes |
| 3 | Authorization of Zest emails | IT / Email | Yes, if email communications are used |
| 4 | Employee login method | IT / Security / HR | Yes |
| 5 | Creation and maintenance of the user database | HR / HRIS / IT | Yes |
| 6 | Administration roles and permissions | HR / IT | Yes |
| 7 | GDPR and data processing | HR / DPO / Legal | Yes |
| 8 | Integrations with your work environment | IT | Depending on your project |
| 9 | Internal communication to employees | HR / Communications | Recommended |
1. 🌐 Check access to Zest
The first step is to make sure that Zest can be accessed from the IT environment used by your employees.
Depending on your organization's security policies, certain access or services may be filtered by:
- a firewall;
- a proxy;
- a VPN;
- web filtering;
- a network security solution;
- a browser extension or content-blocking software.
Disable ad blockers for Zest
Ad or content blockers such as AdBlock, AdGuard, or equivalent solutions must be disabled for Zest.
These tools may block certain services required for the platform to operate correctly.
Zest does not contain any advertising.
Disabling the blocker for Zest simply prevents services required by the platform from being blocked by mistake.
Allow the required domains and subdomains
Your IT team must also allow the domains, subdomains, and services used by Zest.
📄 Please refer to the dedicated whitelisting document below for the complete list of technical elements that need to be allowed:
Network_IPs_Zest_V1.3_EN.pdf 219.0 kBThis list must be shared with your IT or Security team before the first tests are carried out.
Run a test from the actual work environment
Once the required authorizations have been applied, we recommend running a test from a workstation configured in the same way as an employee's workstation.
- Production: https://zestmeup.com/app/
In particular, test:
- access to Zest;
- login;
- the display of the different pages;
- receipt of the first Zest email;
- the main features planned for your project.
Check receipt of the first email
During your tests, once whitelisting has been completed by your technical teams, check that the first email sent by Zest is correctly received in the employee's inbox.
All Zest emails are sent from: [email protected]
The email must not be:
- blocked;
- quarantined;
- classified as spam.
2. 🌐 Check browser compatibility
The Zest web application can be accessed from the main modern browsers:
- Google Chrome;
- Mozilla Firefox;
- Microsoft Edge.
To benefit from the latest improvements and security updates, we recommend using a recent version of your browser.
3. 📧 Allow emails sent by Zest
Zest may send different emails to employees depending on the features being used, including invitations, notifications, campaigns, reminders, or information related to their use of the platform.
All Zest emails are sent from: [email protected]
It is therefore important to prepare your email environment before launching Zest to your employees.
Allow Zest emails
Your IT or Email team must make sure that Zest emails are not:
- blocked;
- quarantined;
- classified as spam;
- filtered by an internal security rule.
📄 Please make sure you consult the Zest whitelisting document.
This document contains the domains, subdomains, and technical information that must be shared with your IT team to correctly allow Zest services and communications.
Check email display
Your email system settings must also allow Zest emails to display correctly.
In particular, check:
- HTML content display;
- image and logo loading;
- access to links included in emails.
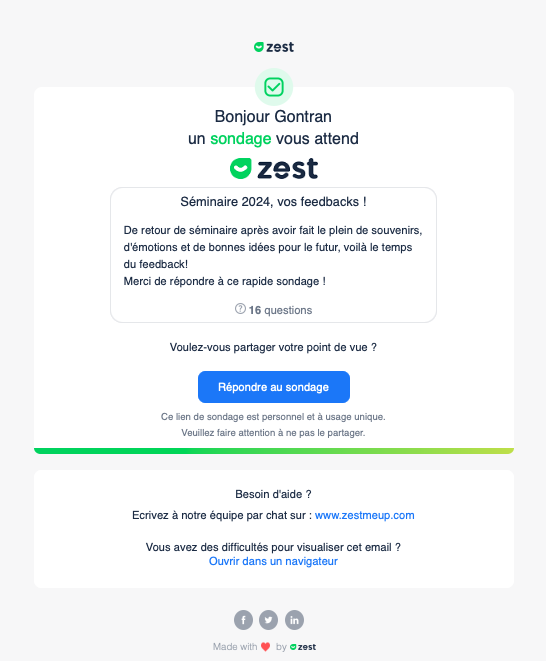
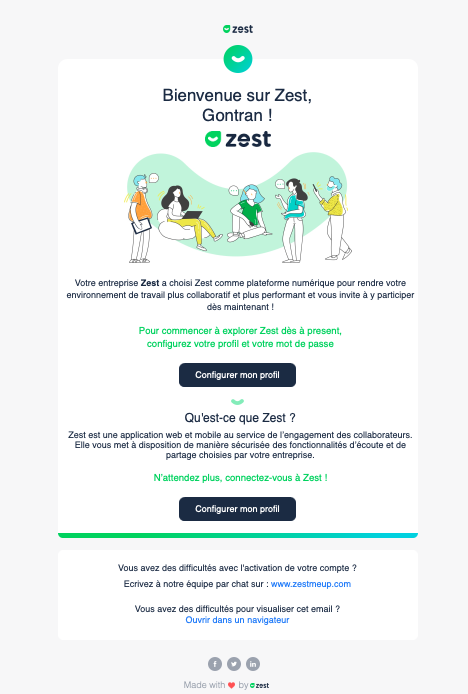
📸 Emails should display with the following graphical layout/design:
Run a test before launch
Before communicating on a large scale, run a test with several users who are representative of your environment.
For example:
- an employee;
- a manager;
- an administrator;
- if necessary, employees located in different countries or entities.
This makes it possible to identify potential filtering issues before the official launch.
4. 🔑 Choose the employee login method
Before importing and inviting your employees, define how they will log in to Zest.
The method selected generally depends on your employee population, your IT environment, and whether your organization uses a corporate authentication system.
👉 To learn about the different login methods, read the article: How to log in to Zest?
Option 1: Login with an email address without SSO
The employee uses the email address associated with their Zest account to access the platform.
This method does not require SSO to be configured with your information system.
It may be suitable when your employees have a professional email address and you do not want to connect Zest to your company's authentication system.
Option 2: Login with an employee ID
Login using an employee ID allows an employee to access Zest using the employee ID associated with their account.
This method is particularly useful for populations that do not necessarily have a professional email address.
The employee ID must therefore be correctly entered in the user database.
💡 Login using an employee ID can make it easier to provide access to field or non-connected employees who have a Zest account.
👉 To find the corresponding login process, read the article: How to log in to Zest?
Option 3: Login with SSO
SSO stands for Single Sign-On.
SSO allows employees to use their company's authentication system to access Zest.
Employees therefore do not need to manage a separate Zest authentication method when using the SSO configured by their organization.
Setting up SSO requires configuration between your authentication environment and Zest.
It must therefore be anticipated with your IT team.
👉 To learn more, read the article: Configure SSO
Which login method should you choose?
| Your situation | Login method to consider |
|---|---|
| Employees have an email address and you do not want to set up SSO | Login with an email address |
| Some employees do not have a professional email address | Login with an employee ID |
| You want to use your organization's authentication system | SSO |
Le choix doit être réalisé suffisamment tôt dans le projet, car il peut avoir un impact sur la préparation de votre base utilisateurs et sur les actions à réaliser par votre équipe IT.
5. 👥 Define how your user database will be populated
For Zest to operate correctly, it must have an up-to-date user database.
This database is used in particular to manage the employees available in Zest and their position within your SmartOrg.
Before launch, define:
- which populations should be included in Zest;
- which data will be transferred;
- who will be responsible for keeping the data up to date;
- how new joiners and leavers will be managed;
- how changes of team, manager, or organization will be handled;
- how frequently the data should be updated.
Several methods can be used depending on the configuration of your project.
Bulk employee import
Bulk import allows you to add or update multiple employees using an import file.
👉 To learn more, read the article: Bulk import employees
Import via SFTP
SFTP can be used to automate file transfers between your information system and Zest.
It can be used when your organization wants to regularly send an updated employee database without manually performing each import.
Setting up SFTP requires configuration with your technical teams.
👉 To learn more, read the article: SFTP Integration
Import via an integration
An integration connects Zest to another tool in your information system.
The purpose is to allow multiple solutions to communicate with each other in order to exchange information or enable shared features.
For example, an integration can allow Zest to interact with a tool that is already part of your work environment.
Each integration has its own operating method and technical prerequisites.
👉 Discover the available integrations in the collection: Integration with Zest
Import via SCIM
SCIM, or System for Cross-domain Identity Management, is a standard used to facilitate the management and synchronization of user identities between different systems.
It can automate certain user management operations between your environment and Zest.
The configuration depends on your technical environment and should be anticipated with your IT teams.
👉 To learn more, read the article: SCIM Integration
Plan for updates after launch
Creating the initial database is only the first step.
Once Zest has been deployed, you should also define the process for managing:
| Event | Action to anticipate |
|---|---|
| New employee joins | Create or add the employee in Zest |
| Employee leaves | Update their presence in the database |
| Change of manager | Update the organization |
| Change of team or entity | Update the SmartOrg |
| Change to employee information | Update the relevant data |
6. 🔐 Define administration roles and responsibilities
Before launch, identify the people who will administer Zest.
In particular, define:
- who has SuperAdmin permissions;
- who maintains the user database;
- who manages the SmartOrg;
- who configures integrations;
- who assists employees if they experience login difficulties;
- who manages the features and campaigns used in Zest.
Some technical configurations or integrations require specific administration permissions.
Defining these responsibilities helps prevent important actions from being blocked after launch because no responsible contact has been identified.
7. 🔐 Validate GDPR and personal data requirements
Deploying Zest involves processing data related to your employees.
Before launch, your HR and Legal teams or your DPO should therefore validate the requirements applicable to your organization.
In particular, we recommend defining:
- the populations concerned;
- the data transferred to Zest;
- the information provided to employees;
- your organization's internal rules regarding personal data.
Customize your DPO contact address
Remember to customize your DPO contact address from your Back Office.
This information allows you to adapt the GDPR notice displayed to employees to your organization.
👉 To learn more, read the article: Customize the GDPR notice in Zest
For more detailed contractual or security information, refer to the current Zest documentation provided as part of your project.
8. 🔄 Connect Zest to your work tools
Depending on your environment, Zest can be connected to certain tools that your employees already use on a daily basis.
These integrations are optional. They are not required to deploy or use Zest.
Their main purpose is to make Zest easier to access and bring certain interactions closer to the employees' usual work environment.
Microsoft Teams
If your organization uses Microsoft Teams, an integration with Zest can be set up.
It allows Zest to be integrated into the Teams environment used by your employees.
This integration can be particularly useful if Teams is already one of your organization's main communication and collaboration tools.
Slack
If your organization uses Slack, Zest can also be connected to your Slack environment.
This integration brings certain Zest interactions closer to the tool your teams use on a daily basis.
Setting it up requires the appropriate permissions to configure the integration in your environment.
An optional integration to consider based on your needs
You do not need to connect Zest to Teams or Slack to launch your project.
Before setting up an integration, simply consider:
- which tools your employees actually use;
- whether the integration provides a benefit to their user journey;
- who will be able to configure it;
- which permissions or approvals are required from your IT team;
- which tests should be carried out before activation.
👉 Find the available integrations and their documentation in the collection: Integration with Zest
💡 Do not confuse these two types of integration: the Teams or Slack integrations presented here relate to using Zest within your work environment.
Solutions used to populate or update your employee database, such as SFTP or SCIM, are presented in section 5. Define how your user database will be populated.
9. 📣 Prepare your internal communication
Once the technical prerequisites have been validated and the project has started, it is essential to prepare your communication to employees.
Communicating in advance helps introduce Zest, explain the project, and prevent the first invitations from being perceived as unexpected.
Your communication can include:
- why your organization is using Zest;
- when Zest will be available;
- how employees should log in;
- which features will be used;
- which emails or notifications they may receive;
- who they can contact if they have a question;
- how data and confidentiality are handled as part of the project.
If you use SSO, specify that employees will log in using the company's authentication system.
If you use login by employee ID or email address, clearly explain the expected login process.
📘 Checklist avant le lancement
Before opening Zest to your employees, check that:
Once these elements have been validated, your environment is ready for the first user tests and for preparing the Zest launch.